Showing posts with label first aid. Show all posts

Sunday, 30 October 2016

Show us your Kits: The first aid edition

Hi everyone,
 
A few months ago I wrote about the contents of my SES kitbag.  This post is a second chapter in "showing us your kits".
 
In the boot of my car I have my first aid bag.  I decided to build my own first aid bag rather than buy a pre-made one from St John Ambulance or Red Cross.  It enables me to customise it to injuries I think I'm likely to encounter.  More importantly, it was cheaper.  So, what do I have?
 
 
The first item is the bag itself.  Yes, it's in camouflage colours, and yes, it does say "NRA".  It came free with renewing my membership of the National Rifle Association.
 
 
The first bundle of items in the bag are cotton balls and cotton tips for wound care.  Along wth them is a triangular bandage for use as a sling, in binding limbs following snakebite, and as a general bandage.  I also have fabric and plastic bandaids, and a box of rubber gloves (they were cheaper than non-latex gloves; economics requires me to hope that I won't have to treat someone with a latex allergy).
 
 
I found that take away containers are ideal for packing things that are prone to leak or burst, and they'll also double as dishes for antiseptic and other fluids.  In this one I've stored a bottle of antiseptic and a pack of antibacterial wipes.
 
 
The next bundle contains a 1 litre bottle of methylated spirits.  "Metho" has a range of uses - it's a brutal but effective antiseptic, it can light a fire (if you're careful), and it eases insect bites.  In the same bundle I have another triangular bandage, two instant icepacks, and an empty water bottle (I'll be the first to admit that it's there under the "it'll come in handy" principle).
 
 
The next bundle is a tape measure, antibacterial soap, paper tape and a torch.
 
 
Another take-away container contains medication: Hirudoid cream (for treating bruising), antiseptic cream (use is fairly obvious), hand sanitiser, and boxes of paracetamol, aspirin and ibuprofen.  This box also contains a crepe bandage, safety pins, tongue depressers and a penknife.
 
 
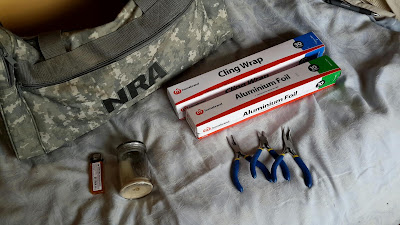
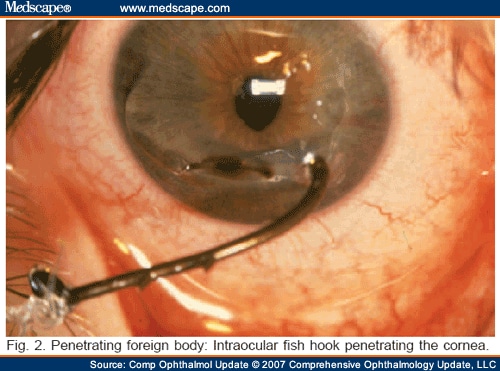
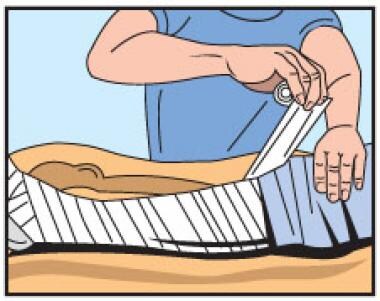
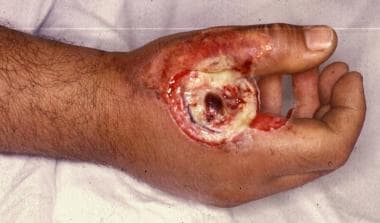
Towards the bottom of the bag is a candle in a sealable jar and a cigarette lighter (as a last-ditch source of light, and as a source of fire).  There are also pliers and snips of various types for dealing with embedded objects.  In general, embedded objects should be left in place to avoid causing further injury or bleeding.  However, cutting an object back may be necessary for casualty comfort, and removing fishhooks is likely to require pliers.  The rolls of clingwrap and aluminium foil are for sealing wounds against contaminants, especially burns or anything where a significant amount of skin has been removed.  n addition, clingwrap can be used to treat open chest wounds: a patch of clingwrap is taped on three sides over the wound, creating a kind of one-way valve.
 
 
At the side of the bag in a stiff envelope are two large non-adherent dressings, as well as the American Red Cross guide to wilderness and remote first aid.  I also carry a copy of the Australian first aid text book, and a 24 pack of AAA batteries.
 
 
In one of the end pockets of the bag are some general emergency resources: scissors, insect repellent, caffeine tablets, a bushfire awareness card, a bible, a notebook and a sealable tin.
 
 
In the other end pocket are some further general resources: some rather crappy field glasses, a solar- and wind up-powered radio, a cooling bandana, duct tape, a plastic rain poncho and a biro.
 
On the to-buy list for me are a couple of military-issue trauma bandages, which have fittings which allow them to be fastened firmly in place on an injury, and also a tourniquet (these are coming back into acceptance for preventing catastrophic blood loss).  I should also buy (don't laugh) a box of tampons, as these are recommended for managing puncture wounds where the object is not embedded in place.
 
So there you have it.  Do you carry any first aid gear with you?  Or any other emergency items? What do you have?

Sunday, 25 September 2016

Deeper into First Aid

Hi everyone,
 
Sunday evening, and I'm typing this with a glass of wine and trying to block out the noise of someone watching Major Crimes (really, how on earth does this dreck get made?).  As you know, the last few days have been heavily taken up with forms of first aid training.
 
I mentioned in the last post that I'd been on the Careflight Trauma Care workshop.  This was a little short of the full Advanced First Aid course, but invaluable for teaching about the more extreme types of injuries that one can find.  It took in how to treat crush injuries and severe burns, and even how to treat traumatic amputations.  I have the impression (couldn't get a confirmed answer) that some of the things they recommended - like use of tourniquets and pressure points to control bleeding - are still not approved techniques.  As such, SES members are probably not permitted to apply them in the course of our work.  On the other hand, I think it'll be useful for me to procure some of their recommended items for my own first aid bag.  Proper preparation for that sort of thing has been more and more on my mind as the acolytes of ISIS spread their mayhem around the world.  I doubt I have any great aptitude for inflicting injuries, even in defence of myself or others.  I hope to reach a point where I can do something about the resulting damage though.


The last two days (that is, this weekend) I've been up at Wangaratta on an SES-sponsored course in mental health first aid.  That is, how to provide initial care for someone suffering depression, anxiety, psychosis or substance-abuse disorders.  It covered the things you really need - how to start the conversation with someone who is in distress, how to point them in the right direction and be sure they get there, and how to deal with someone at risk of injuring themselves without putting yourself in danger.  Sadly, mental problems being lived out in the public street are becoming more common, not least because of the rise of drugs like Ice.
 
I should add that Wangaratta has one other big advantage: it's built on flat ground, so it was ideal country to start today off with a run.  I find that they're critical on these weekends, because one of the side-effects of a course run at a hotel is that they're usually pretty well catered and you inevitably eat far too much!  This early start (on top of quite a few other early starts and late nights) is one reason I'm really looking forward to bed tonight.


I saw a good quote recently about this sort of thing on Instagram from student nurse Allie Pendzich: You do not study to pass the exam, you study to prepare for the day YOU are the only thing between a patient and the grave
 

I'm as guilty of badge-hunting as anyone.  I don't think you can do emergency work as a volunteer without taking a strong pride in adding to your skills and competencies.  This is healthy and it keeps us keen.  But sometimes we have to remind ourselves that what we do isn't a hobby or simply a chance to make friends.  We train and keep our skills sharp because one day our training will be all that stands between the Grim Reaper and a human being.

Friday, 23 September 2016

Adventures in the North East

Hi everyone,

I've only got a few minutes to write, I'm afraid.

It's been a good couple of days:  I spent yesterday and the day before up at Beechworth on the CareFlight "Trauma Care Workshop".  I'll wrote more about this when I have more time.  Suffice to say that Careflight are a charitable ambulance service who have taken to running free trauma care workshops for emergency volunteers (cost of each course?  about $10,000.00!).  We get the benefit of the experience they've built up doing jobs like this -


It turned out one of our instructors had previously been an army medic in Iraq and Afghanistan, so he had a lot to share on trauma care.  I was up there with Beck, one of my friends in the Unit, and she showed me some of the highlights of the area I hadn't seen before.  Despite spending a lot of time up there, I'd never seen the Hume Weir -


or the Woolshed Falls, for example.


This weekend will also be SES-heavy: I'm off to Wangaratta for the Mental Health First Aid course.  Should be a good one. 

More soon.

Wednesday, 29 June 2016

First on Scene: Managing traumatic injuries.

Emergency response and civil defence teams will sometimes find themselves at an incident where people have been injured and paramedic and similar care is not available.  When this occurs, it remains possible to respond effectively.  Essentially all responders will have first aid training; this note covers the systems which allow that training to be most effectively deployed.

In preparing this note I have drawn heavily from Wildernessand Remote First Aid (American Red Cross, n.p., 2010) and Ian Dunbar, VehicleExtrication Techniques (Holmatro, n.p., n.d.).

Scene Control

Confirm that the scene is safe (or is made safe) for your crew, the casualty and any bystanders.  Consider whether safety may be affected by daylight, environmental or weather factors.

Establish what happened, how many casualties there are and whether any of them are unconscious (ask bystanders and casualties).  If the incident was a high-impact event (for example, a road accident), it may be worth taking the time to work out the level of force which will have been exerted on a casualty using the formula E = ½M x velocity2, or E (in joules) = ½ mass (in kilograms) x velocity2 (in metres per second).  The greater the energy in joules, the higher the impact on the person, and the more severe their potential injuries.  By way of example, a person weighing 80 kgs who has been involved in a collision at 65 km/h (or 18 metres/second) will have a formula reading E = (½ x 80) x 182 = 12.96 kilojoules.

Consider what resources you have available to care for the casualties and whether further resources will be needed.

Casualty Management

Conduct a primary assessment of each casualty.  If required, also conduct a secondary assessment and take a SAMPLE history.  Document the information you obtain.

Primary Assessment

Assess for life threatening conditions with ABCDE questions –

A – Tilt the casualty’s head back and lift the chin to open the airway.  If the casualty can speak or breathe, their airway is open.
 
B – Spend ten seconds checking whether the casualty is breathing.  If not, commence cardiopulmonary resuscitation (CPR).
C - Check the casualty’s circulation.  If no pulse is found, commence CPR.  If the casualty is bleeding, expose the wound and apply firm direct pressure.
D – Check for any disability which may have been caused by a spinal injury.  If there appears to be a spinal injury, task a member of your team with ensuring the casualty’s back and neck are kept straight.  If the casualty is face down, use the log-roll technique to turn them face up.
E – Check for indications that the casualty has been exposed to severe environmental conditions, particularly extreme heat or cold.
 
Logrolling casualty from their chest to their back
Parts A, B and C of the above process are critical, and should be carried out first on unresponsive casualties who cannot communicate their distress.  Two of the greatest contributors to death in the first hour after an accident are loss of an airway and significant internal or external blood loss.
If you identify a life-threatening injury, treat the condition with the resources you have to hand and send for help.  The person sent to get help should be able to advise as to the location of the incident, the casualty’s injuries, any relevant environmental conditions and the resources available at the scene.
If no life-threatening condition is found, conduct a secondary assessment and gather a SAMPLE history.

Secondary Assessment.

A secondary assessment is significantly more detailed.

Hands-On physical assessment

With the casualty’s consent, conduct a hands-on physical assessment.  Look for deformities, open injuries, tenderness and swelling.  Check for circulation, sensation and motion of each limb.  Also check the colour, temperature and moisture of the casualty’s skin.

Responsiveness

Responsiveness can be assessed using the AVPU scale –

A – Is the patient alert and able to answer questions?
  • A+Ox4 = Casualty knows who they are, where they are, what day it is and what happened.
  • A+Ox3 = Casualty knows who they are, where they are and what day it is.
  • A+Ox2 = Casualty knows who and where they are.
  • A+Ox1 = Casualty only knows who they are.
V – Responds only to verbal stimuli (if you speak or shout at them)

P – Responds only to painful stimuli (e.g. a pinch)

U – Casualty is unresponsive to stimuli.

Vital signs

Does the casualty have normal vital signs?  For an adult, these signs will be –
  • 12-20 regular and unlaboured breaths per minute.
  • 50-100 strong and regular heartbeats per minute.
  • Skin found to be warm and dry to touch and a colour appropriate for the person’s ethnic background.

Focussed Spinal Assessment

If you suspect that there is a spinal injury but cannot find any signs or symptoms, ask the following questions.  If the answer to each question is ‘yes’, spinal immobilization can be discontinued.
  1. Does the casualty appear to be reliable?  That is, on the AVPU scale, is the casualty at least A+Ox3?  Are they sober and not distracted by injuries or other factors?
  2. Can the casualty move their limbs and do they have normal sensation in them?
  3. Does the casualty have a firm hand grip and can they lift their legs against resistance?
  4. Does their spine have a normal range of motion, and do they deny pain or tenderness in the spine

SAMPLE History

Take a medical history from the casualty by asking the SAMPLE questions.
S – Signs and symptoms.  Ask the casualty what hurts?  Are they suffering pain, nausea, light-headedness or any other abnormal sensations?
A – Allergies.  Do they have any allergies?  Have they been exposed to anything which is likely to cause a reaction.
M – Medications.   Are they taking any medications?  If so, what for and when did they last take it?
P – Past medical history.  Ask if this sort of thing has happened before and whether they are currently seeing a doctor for any significant condition (for example, cardiac or respiratory).  Ask whether they have recently had surgery and (if female) whether they are pregnant.
L – Last intake and output.  Ask when they last ate or drank, and how much.  Are they currently hungry or thirsty, and when did they last relieve themselves?
E – Events leading up to the incident.  Ask how and when the incident happened.
Image from here

Evacuation

A decision will need to be made on whether to remain in place or to evacuate the casualties.  Before deciding, you should weigh up -
  • How severe are the casualties' injuries, and do you have crew and equipment which will allow the casualty to be moved safely?
  • How far will they need to travel, and over what terrain?
  • How long will it be before outside help arrives?
  • Are there particular hazards where you are? (eg rising flood water).  Will the weather be a problem if you do evacuate?

Swift evacuation

If you decide to evacuate, a swift evacuation is required for in cases of –
  1. Worsening vital signs (including an increasing heart rate)
  2. Hypothermia
  3. Head injuries including skull fracture or suspected stroke; seizures which do not resolve within 10 minutes; and altered mental state caused by extreme heat.
  4. Near-drowning causing loss of consciousness or respiratory problems.
  5. Lightning strike.
  6. Anaphylactic reaction (even if treated with an epipen or similar device).
  7. Spinal injury
  8. Heart attack, or chest injury followed by difficulty breathing
  9. Serious infection or serious abdominal problems.
  10. Open or angulated fractures, or fractures of the pelvis, hip or femur.
  11. Injuries causing a loss of sensation, circulation or movement beyond the injury itself.
  12. Any wound that was caused by crushing or impalement; involved ligaments, tendons or a joint space; is deep and affects the face; or was caused by an animal bite or is otherwise contaminated.

Slow Evacution

A slow evacuation is appropriate if the casualty has –
  1. One or more broken ribs.
  2. Persistent abdominal pain.
  3. A first-time joint dislocation, or any injury that prevents use of a limb.
  4. Unresolved heat exhaustion or mild hyponatremia.
  5. A wound which cannot be closed, or an infection which does not improve within 12 hours of treatment.
  6. Mild head injury.
Image from here
 

Handover

If you are in a position to hand over management of the casualty to a paramedic, advise them in the MIST pattern -
M – Mechanism of injury
I – Injuries (both suspected and confirmed)
S – Signs and symptoms
T – Treatment given.

Thursday, 21 January 2016

First aid brushup: Wound management - Crush injury

These injuries are potentially very serious: where a major muscle mass has been compressed for an hour or more, significant toxins will build up.  When the pressure is released, these toxins can enter the bloodstream and cause severe illness or death.


Image from here

Identification

Be particularly alert for restriction of blood flow to a major muscle mass for an hour or more.  The casualty may complain of numbness or tingling at the crush site.  They may also show signs of shock, and there may be swelling, bruising or rigidity.

Management

An ambulance should be called and resuscitation performed if required.


If there is reason to suspect the casualty has been crushed for an hour or more, do not remove the object without a medical team present as this may release the toxins.  In other cases, remove the crushing force without delay if this is physically possible.  Bleeding should be controlled and the casualty kept warm.

Acknowledgement

As with other posts in this series, the information supplied is from Kym Eden's Fun with First Aid (2013).

Wednesday, 20 January 2016

First aid brushup: Wound management - Embedded objects

Identification

It is to be hoped that the object will be visible to the eye.


Image from here

Management

First and foremost: Do not remove the object.  Doing so has the potential to cause severe bleeding. 


Medical assistance will be required (an ambulance may be best).


First aid should consist of applying firm pressure around the wound (not on the object), ideally with a clean pad.  Padding should be placed around the object to support it, and then bandage the padding in place to keep the object stable.  If the injury is to a limb, elevate it (if possible) to reduce swelling.

Acknowledgement

As with other posts in this series, the information supplied is from Kym Eden's Fun with First Aid (2013).

Tuesday, 19 January 2016

First aid brushup: Wound management - Eye injuries


Identification

Eye injuries are particularly uncomfortable and the casualty is likely to report one which has occurred.  A penetrating eye injury will also be accompanied by bleeding inside or from the eye, and the casualty may complaint that their vision is distorted or that they are sensitive to light.


Image from here

Management

If a foreign object is visible in the eye and is small, a damp tissue may be able to remove it.  Alternatively, it may be possible to wash it out with a steady stream of clean water, saline solution or the casualty's own tears (have them tilt their head towards the injured side).  If the object cannot be seen (or if seen, cannot be readily removed) cover the eye and take the casualty to a doctor.


You should not attempt to remove foreign objects from the eye if they are over the pupil.  Rubbing the eye (by the casualty or by a first aider trying to remove the object) is likely to cause further damage.


Where a penetrating eye injury has occurred, call an ambulance.  While waiting, have the casualty lie down with their head slightly raised on a pillow.  Padding should be placed around the object to support it, and then bandage the padding in place to keep the object stable.  Do not attempt to remove or touch the object.  The uninjured eye should also be covered, as this will discourage movement of the eyes and reduce the risk of further injury.

Acknowledgement

As with other posts in this series, the information supplied is from Kym Eden's Fun with First Aid (2013).

Monday, 18 January 2016

First aid brushup: Wound management - Mouth injuries (non-dental)

Identification

Injuries to the tongue, cheeks or lips may be readily reported by the casualty.

Management

Where a cheek has been injured, have the casualty sit up with their head leaning forward and towards the injured side to allow blood to drain.  Pressure should be applied to the wound with a clean pad.  Rinsing the mouth out is not recommended as this will interfere with clotting.  It may be wise to loosen restrictive clothing around the neck.


Where the tongue has been bitten, water should be used to wash the area clean.  The tongue can be pressed against the roof of the mouth to apply pressure to stop the bleeding, and applying ice will help reduce swelling.  Similarly, where a lip has been injured, water should also be used to wash the area clean and ice given to reduce the swelling.


In all cases, injuries to the mouth should be monitored for infection and injuries that seem significant should be referred to a doctor.

Acknowledgement

As with other posts in this series, the information supplied is from Kym Eden's Fun with First Aid (2013).

Sunday, 17 January 2016

First aid brushup: Wound management - Dental injury

It may be possible to replant a tooth which has been knocked out.

Identification

This should be reasonably obvious.


Image from here

Management

The injury to the mouth can be managed by having the casualty sit up with their head leaning forward and towards the injured side so that any blood can drain.  Pressure should be applied to the bleeding socket with clean gauze pad for about 10 minutes (biting may be an effective way to do this). 


Rinsing the mouth out is not recommended as this will interfere with clotting.


The tooth should only be handled by the enamel (not by the roots).  Any dirt should be gently cleaned off it with water or with the casualty's saliva.  However, do not store the tooth in water.  You can attempt to reimplant the tooth provided the casualty is not drowsy, young, unconscious or distressed.  Alternatively, a dentist should be consulted as soon as possible; in the meantime the tooth should be stored in a glass of milk, or wrapped in cling wrap or foil.

Acknowledgement

As with other posts in this series, the information supplied is from Kym Eden's Fun with First Aid (2013).

Saturday, 16 January 2016

First aid brushup: Wound management - Bleeding from the nose

Identification

Blood noses are unlikely to be a serious problem, but may be upsetting to young children.

Management

Encourage the patient to sit up and lean their head forward slightly.  If possible, they should pinch the soft part of the nose for about 10 minutes, and breathe through their mouth.  Blowing the nose is not recommended.


The casualty's collar and/or tie should be loosened and cool wet towels (or an icepack wrapped in a towel) should be placed around the neck or on the forehead.


If the nose bleeds for longer than 15-20 minutes, medical review may be wise.

Acknowledgement

As with other posts in this series, the information supplied is from Kym Eden's Fun with First Aid (2013).

Friday, 15 January 2016

First aid brushup: Wound management - Bleeding from the ear

Identification

Bleeding from the ear can result from different causes.  A burst eardrum may have been caused by trauma, an explosion, or a foreign body being pushed into the ear.  In this case, the casualty may have difficulty standing and complain of deafness and sharp pain or earache.


Image from here


If the casualty has sustained a blow to the head, the ear may bleed watery blood.  This is serious and suggests a possible skull fracture.

Management

Conscious casualty

Encourage the patient to sit with their head leaning toward the injured side so the blood drains.  If the injury is minor, apply gentle pressure with a clean sterile pad.


If the injury may be serious, place the casualty in the recovery position with a clean pad under the ear.  Allow it to drain freely.  An ambulance should be called.

Unconscious casualty

Perform resuscitation if necessary and send for an ambulance.  After breathing is restored, put the casualty in the recovery position with the injured ear downward and allow the ear to drain into a clean pad.  Do not plug the ear

Acknowledgement

As with other posts in this series, the information supplied is from Kym Eden's Fun with First Aid (2013).

Thursday, 14 January 2016

First aid brushup: Wound management - Scalp and Head Wounds

Be aware in cases of scalp and head wounds that there may be more serious underlying injuries, including concussion, skull fractures and spinal injuries.

Identification

Blood vessels run close to the surface on the head, so any wound will bleed profusely.


Image from here

Management

Encourage the casualty to lie down with the head and shoulders slightly supported.  Cover the wound with a clean (ideally sterile) pad and apply firm pressure (but be aware of the risk of a skull fracture).  Secure the pad in place with a bandage.


Because of the risk of head injury, medical assessment would be prudent.

Acknowledgement

As with other posts in this series, the information supplied is from Kym Eden's Fun with First Aid (2013).

Wednesday, 13 January 2016

First aid brushup: Wound management - Amputation

Some accidents may be severe enough to sever or partially sever all or part of a limb.

Identification

An injury of this severity will be hard to miss.


Image from here

Management

Send for an ambulance.  In the meantime, firm pressure with a clean pad should be applied to the wound.  The pad should be secured in place with a tape or bandage


The severed body part should placed in a sealed, airtight plastic bag or container or wrapped in clingwrap.  This 'package' should then be placed in another layer of plastic, and then the whole placed in a container of water.  If possible, add crushed ice to the water to chill the body part.  Mark the container with the casualty's name, date and time and ensure it is handed to the attending paramedics.


Critically, do not let the body part come into direct contact with the ice or water, do not wash it, and do not place it in a fridge or freezer.

Acknowledgement

As with other posts in this series, the information supplied is from Kym Eden's Fun with First Aid (2013).

Tuesday, 12 January 2016

First aid brushup: Wound management - Shock

Shock is the loss of blood volume or pressure to organs in the body which causes them to cease normal function.  Ultimately this condition can result in death.


Image from here

Identification

If possible, find out whether there is a history of any of the following -
  • Multiple fractures or trauma (including brain or spinal injuries)
  • Severe bleeding
  • Severe fluid loss (for example, from dehydration, burns or diarrhoea)
  • Severe infection
  • Allergic reaction

Stages of Shock

Initially the casualty may have pale, cold and clammy skin and their breathing and heart rate increase.


As the condition continues, parts of their boddy (especially the lips) may take on a grey-blue colour and they may appear weak, dizzy and restless.  They may complain of nausea and marked thirst and sweating.


When the supply of blood and oxygen to the brain decreases, you may identify enlarged pupils, drowsiness and yawning, confusion and a drift into unconsciousness.

Management

Conscious casualty

Send for an ambulance.  While waiting, encourage the casualty to lie down on a blanket (or at any rate, on something which will insulate them from cold ground).  If possible, raise their legs to improve blood supply to vital organs, and loosen clothing around the neck, chest and waist to assist breathing.  Do not allow them to eat or drink while waiting for the ambulance, but moisten their lips to help control thirst.

Unconscious casualty

Request an ambulance, and provide CPR and defibrillation if necessary.  When breathing resumes, move the casualty into the recovery position, and then manage any other injuries.  Closely monitor their condition.

Acknowledgement

As with other posts in this series, the information supplied is from Kym Eden's Fun with First Aid (2013).

Monday, 11 January 2016

First Aid brushup - Particular Hazards: Dirty Bombs


There has been a lot of attention lately on the North Korean nuclear weapons test.  First aiders might find useful a brushup concerning a more 'down to earth' atomic hazard: the risk posed by a "dirty bomb".

The risk

A "dirty bomb" (sometimes called a 'radiological dispersal device') combines conventional explosives with radioactive material (for example, certain types of medical and industrial waste).  This combination is unnerving but should not be exaggerated: a dirty bomb is not a nuclear device.  A nuclear weapon, like that tested by North Korea, splits atoms to cause a catastrophic explosion and widespread radioactive contamination.  A dirty bomb is simply a conventional device with contaminants added.

Identification. 

An explosion is proverbially hard to miss, but radioactive material is unlikely to be obvious unless (for example) the debris contain material with a hazardous goods label.


Image from here


Ideally emergency responders will be equipped to detect radiation in the area of an explosion and will be able to relay suitable warnings.  It is probably not worthwhile obtaining one’s own Geiger counter or similar advice: the United States' Nuclear Regulatory Commission warns thatmany of the Geiger counters available commercially are uncalibrated and worthless”.


The Centres for Disease Control advise that radiation injuries may be indicated by the skin becoming red and swollen and the casualty complaining of nausea, vomiting and diarrhoea.  However, they caution that the low radiation levels expected from a dirty bomb situation are unlikely to cause symptoms.

Management

Blast Injuries

Where people have been injured in the explosion itself may require first aid for blast trauma.

Radiation Exposure

Casualties who have not suffered blast injuries but who may have been exposed to radioactive material should be encouraged to avoid any obvious clouds of smoke or dust, and to breathe through tissues or cloth to avoid inhaling radioactive particles.  They should not touch detritus in the area of the explosion which may be contaminated.  For the avoidance of doubt, unpackaged food or water in the area of the explosion may have become contaminated and should not be eaten.  However, food in sealed containers should be safe as long as the outside of the container is washed before it is opened.

Shelter

Casualties should be encouraged to take shelter inside a building of which the doors and windows can be closed, and to avoid public transport.  Once inside the building they should move to an inner room if possible, and limit exposure to radioactive particles which may be outside by closing the doors and windows and shutting off ventilation, heating or air conditioning which draws air in from outside.

Decontamination

It would be prudent for casualties (once indoors) to take off any clothing which may have become contaminated and to put it in a sealed plastic bag along with the cloth or similar item through which they were breathing (the clothing can be examined by an expert to estimate the casualty’s degree of exposure to radiation).  As soon as possible they should wash thoroughly to remove radioactive particles from the skin and hair.

Medication

Anti-radiation medications (for example, potassium iodide) may not be helpful and medical guidance should be sought.

Acknowledgement

This post was prepared using information from the websites of the United States' Nuclear Regulatory Commission, the Centres for Disease Control and the Nuclear Energy Institute.

First aid brushup: Wound management - Bruising

Identification

The skin will be discoloured and may be swollen because of the rupturing of internal blood vessels at the injury site.


Image from here

Management

Use firm pressure to apply a cold pack to the injured area.  An ice pack or a bag of frozen vegetables will be ideal.  If possible, raise or support the injured body part into a comfortable position.

Acknowledgement

As with other posts in this series, the information supplied is from Kym Eden's Fun with First Aid (2013).

Sunday, 10 January 2016

First aid brushup: Wound management - Internal Bleeding

Identification

Internal bleeding is not easy to identify, but can be suspected where the casualty has sustained a fracture, or may have suffered a ruptured internal organ, or has a history of a stomach ulcer.  Look for blood emanating from a body opening (by coughing or vomiting, trickling from the ear or nose, or passing with urine or excrement).


A casualty may show signs of shock, like cold and clammy skin, becoming pale, complaining of thist or acting in an anxious and restless manner.  Their pulse may become weak or rapid and their breathing shallower.

Management

Management options are limited.  An ambulance should be sent for immediately and the casualty kept as comfortable as possible.  If possible, raise their legs to improve blood supply to vital organs, and loosen clothing around the neck, chest and waist to assist breathing.  Do not allow them to eat or drink while waiting for the ambulance, but moisten their lips to help control thirst.

Acknowledgement

As with other posts in this series, the information supplied is from Kym Eden's Fun with First Aid (2013).

Saturday, 9 January 2016

First aid brushup: Wound management - External Bleeding

Identification

External bleeding will follow from a wound to the flesh.  The four types of wounds are -
  • Abrasians and grazes: The rubbing- or scraping-away of the skin surface.  Only small capillaries are damages and so bleeding should be fairly slight.
  • Lacerations: The tearing of the skin by a sharp object (for example, barbed wire).  The edges of the wound will be jagged and uneven.  Lacerations can be very deep and cause severe bleeding.
  • Incisions: Clean cuts through the flesh caused by a sharp object (for example, glass or a blade).  These wounds are often deep and will bleed profusely.
  • Puncture wounds: Piercing of the flesh by a pointed object (for example, a spike or a bullet).  The wound may close around the penetration and bleeding may not be severe, although infe ction may be carried deep into the wound.

Types of bleeds

In general, the brighter and more free-flowing the blood is, the more urgent will be the need to control the bleeding.  The following points are worth noting
  • Blood which is a bright red colour and moves in spurts indicates bleeding from an artery.  These injuries cause high blood loss.
  • Blood which is dark red and flows freely indicates bleeding from a vein.  The loss of blood can be significant.
  • Blood which is bright red but oozes comes from injured capillaries.  The blood loss will tend to be slight.

Image from here

Management

In all cases, check the wound and confirm that there is no foreign object.

Minor bleeding

Clean the wound with warm soapy water or a solution of antiseptic, then apply a clean (ideally non-adherent) dressing.

Significant bleeding

Direct pressure should be applied to the wound, ideally with a clean pad.  Secure the pad in place with a bandage which is tight enough to hold it in place but not so tight it restricts circulation.  If casualty bleeds through the pad, remove the bandage and place a second pad on top of the first (replace the second pad as necessary).  Do not remove the first pad unless significant bleeding continues: if this occurs you may need to remove the pad to identify the injury site more precisely so to apply pressure to it.


If the bleeding is from a limb, elevate it above the level of the heart so as to reduce the blood flow.  Remember to reassure the casualty and keep them calm so as to keep their heart rate down.

Extreme Circumstances

Life-threatening bleeding can be controlled by an arterial torniquet.  However, this may well cause catastrophic damage to a limb.  A torniquet can be applied by wrapping a bandage of at least 2 inches / 5 centimetres directly above the knee or elbow.  Apply it tightly enough to stop circulation of blood to the limb.


This should only be used as a last resort when all other methods of controlling the bleeding have failed.  Eden suggests traumatic amputation or shark attack as examples of injuries which may require a tourniquet.

Acknowledgement

As with other posts in this series, the information supplied is from Kym Eden's Fun with First Aid (2013).

Wednesday, 6 January 2016

First aid brushup: Snake bite


Hi everyone,

My good friend Alix suggested a first aid brushup covering snakebite.  It's mid-summer here, so I'm more than happy to oblige.

 
The most important thing to know is that the snake venom travels in the bloodstream, but usually does not enter it directly.  The bite is more likely simply to pierce the skin.  Venom then slowly seeps through the body's tissues and from there goes into the bloodstream.  If the casualty remains as still as possible, the venom will move far less quickly.

Identification

The victim of a snakebite may not know they have been bitten.  The bite itself may leave no visible fang mark(s), or only leave a scratch.

The casualty may complain of a headache, blurred vision, confusion or feeling faint or weak.  They may appear drowsy or restless.  The casualty may be noted to have trouble breathing, speaking or swallowing, or to be salivating or perspiring more than usual.  They may also complain of abdominal pain, nausea or vomiting.  Where a limb has been bitten, the glands in the groin or armpit may become swollen or tender.  There may also be weakness or paralysis in the limbs.

Response

For all types of snakebite

The casualty should be made to lie down and keep still.  Monitor them closely.  If necessary treat for anaphylaxis or administer resuscitation.  Send for an ambulance.

Do not wash the wound: a swab of the area will often enable treaters to select the right antivenom.  You should not cut the bite and try to suck out the venom.

Bite on a Limb

Apply "pressure immobilization" by placing a pad over the bite, and then wrapping a broad pressure bandage over the pad and around the limb.  Ideally, use an elasticised bandage.  If all else fails, use strips of cloth 3-4 inches (7-10cm) wide.

Once the pad is bandaged in place, wrap the entire limb in a second bandage from the fingers or toes to the shoulder or groin.  Any clothing should be covered by the bandage: removing it will tend to move the venom.  The bandage should be too tight to slide a finger between it and the skin or clothing, but not so tight as to restrict circulation.  On that note, do not apply a tourniquet.

Image from here

The bitten limb should be immobilised by binding it against a splint with broad or triangular bandages.  Alternatively, a bitten leg can be bandaged against the unbitten leg, and an arm can be placed in a sling or bound against the body.

You should not remove the bandage or splints once applied.  Do not elevate the limb as this will tend to speed up movement of the venom.

Bites not on a limb

If the casualty has been bitten on the abdomen, apply firm direct pressure over the bite to the extent that you can do so without restricting breathing or chest movement.  If the bite is to the neck or head, do not apply firm pressure.

Bitten while alone

If you have been bitten while on your own, call an ambulance and apply pressure immobilisation.  Keep still until help arrives.  If you must move, do so as gently or slowly as possible while keeping pressure over the bite.

Acknowledgement

As with other posts in this series, the information supplied is from Kym Eden's Fun with First Aid (2013).

Tuesday, 5 January 2016

First aid brushup: Burn Injuries (Part 2 of 2)

This is part two of another first aid review post.  I've previously discussed treatment of common burns.  This part deals with burn injuries for which particular measures are needed.  As usual, I have drawn heavily on Kym Eden's Fun with First Aid.

Welder's Flash

A particular type of first degree burn can affect people exposed to ultraviolet light.  It is known as "welder's flash" or "arc eye" because it commonly affects welders.


Image from here

Identification

The casualty's eyes will be red and watering, and they will complain of pain and a sensation like sand in their eyes.  They may be very sensitive to light.

Treatment

Cool wet packs should be applied to the casualty's eyes.  It may be wise to have them remove any contact lenses.  Medical review is recommended.

Airway burns

Be alert to these if the injury occurred in a confined space or it is otherwise thought the casualty may have inhaled hot air or gases.  Where the airways have been badly affected, they can swell and restrict breathing.  Medical assistance is highly recommended.

Identification

The casualty's voice may be hoarse and it may be difficult for them to breathe or speak.  Their face or toungue may be swollen, There may also be singeing of the hair or nasal hair, and black carbon deposits in the nose and mouth.

Treatment

Send for an ambulance.  The casualty will find it easiest to breath if they sit up and lean forward.  They can be given cool water to sip, and the neck area should be cooled with compresses.  Tight restrictive clothing around the neck, chest and waist should be loosened.  If the patient becomes unconscious, move them into the recovery position and monitor their breathing.  If necessary commence resuscitation.

Electrical burns

Identification

These injuries may not be obvious as much of the damage will be internal.  There may be an entry and exit wound.  See whether the surroundings indicate an electrical incident has taken place.


Image from here

Treatment

Firstly, watch for danger.  If you consider that there is a credible risk of live electricity, stand back until you are confident the risk has been removed.  This may be as simple as turning off a switch or may require disconnection by the power company (a piece of advice I have received is to assume that a power line is live until you have seen an electrician pick it up with an ungloved hand!).


Remove any burned clothing which is not adhering to the casualty's wounds, and flood the entry and exit wounds with cool water.  Cover any burns with dry, sterile, non-adherent dressings.

Chemical and similar burns

If it appears the casualty has sustained a chemical burn, try to identify the substance involved so to advise medical staff.

Identification

The skin may be blistered, swollen and discoloured.  The casualty may also complain of severe stinging pain, and there may be chemical containers in the area.  Chemical burns can also cause poisoning, and so the casualty may be complaining of blurred vision, a headache and nausea.


Image from here

Treatment

Removing or reducing exposure is key.  To the extent possible, avoid contact with the chamical yourself.  Remove the patient from the area and if possible take off contaminated clothing.  Flood the burned tissue with cool running water for 20-30 minutes.  Burns should be covered with a dry, sterile, non-adherent dressing and an ambulance sent for.

Chemical injuries to eyes

If the burn is to one or both of the eyes, have the patient sit with the affected eye facing downwards.  Gently flood the eye with cool running water for 20-30 minutes, if necessary prizing the injured eye open.  If necessary the casualty should remove any contact lenses.  A sterile pad or non-adherent dressing should be applied to the injured eye.

Phosphorus burns

If the burn has been caused by phosphorus, keep the injured body part wet or submerged in water continuously (phosphorus will ignite when exposed to air).  Use forceps or a similar device to pick off phosphorus particles, and cover minor burns with a wet compress.  Medical assistance should be sought.

Molten substance burns

Burns caused by molten substances (for example, metal or bitumen) are generally treated as for third degree burns.  The injured area should be flooded with cool running water for 30 minutes (or until the substance has cooled), and after that cold compresses should also be applied. 


Clothing or jewellery should be removed if it may affect circulation when swelling sets in.  However, it is best not to remove the molten substance (save where it blocks an airway or encircles a limb such that circulation may be affected) because this may cause more skin damage.  The injury should be covered with a dry, sterile, non-adherent dressing and the injured limb elevated.  An ambulance should be called.

Cold burns

Identification

Where a casualty has suffered a cold burn, their skin will become hard and will be cold to the touch.  It will appear waxy and pale.  The casualty may complain of numbness, 'pins and needles' or other altered sensation.  When the burn begins to recover it will become red, hot, blistered and painful.


Image from here

Treatment

If physically possible, the casualty should be encouraged to warm the injury with their own body (for example, putting a hand under their arm).  If the face, nose or ears are affected, cover them with a towel or something similar to help them warm.  Consider using lukewarm water to return heat to the injury.  Elevate the limb to reduce pain and swelling, and gently apply a soft clean dressing.